
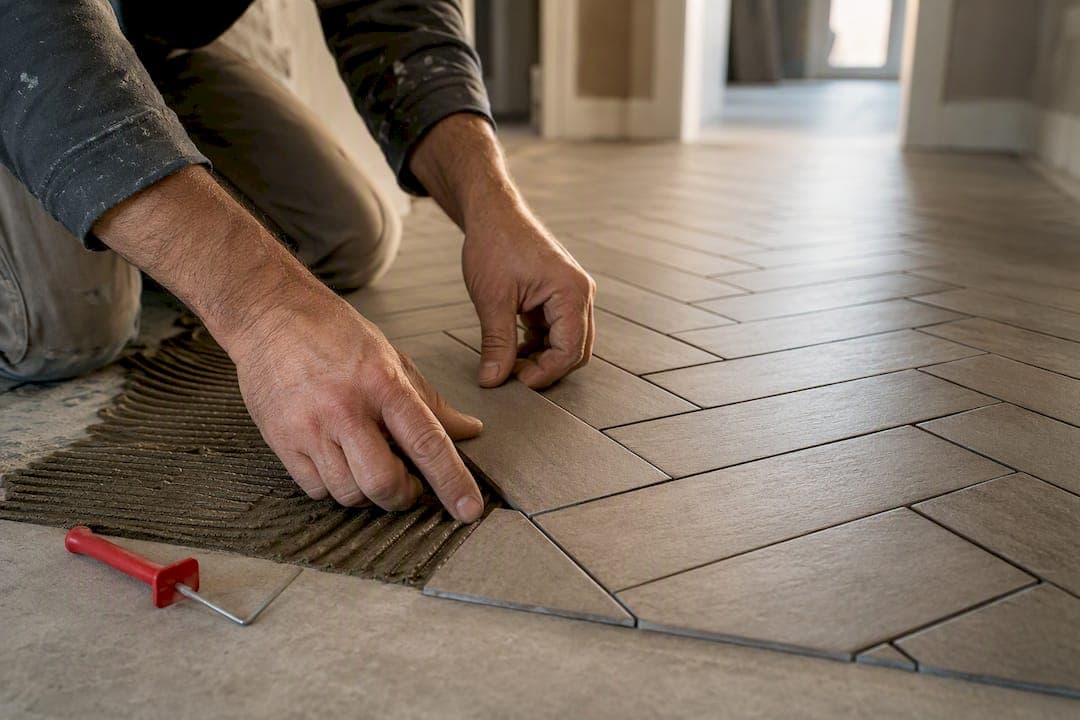
Tile layout patterns are the intentional arrangements of tiles that change a room's look and scale. The go-to options for most homeowners are straight or stack, running bond, herringbone, chevron, diagonal, basketweave, hexagon, and mosaics. Pick a pattern by matching your tile's shape to the effect you want: rectangular tiles suit herringbone and brick bond, while square tiles handle checkerboard, stack, or diagonal layouts best.
TL;DR:
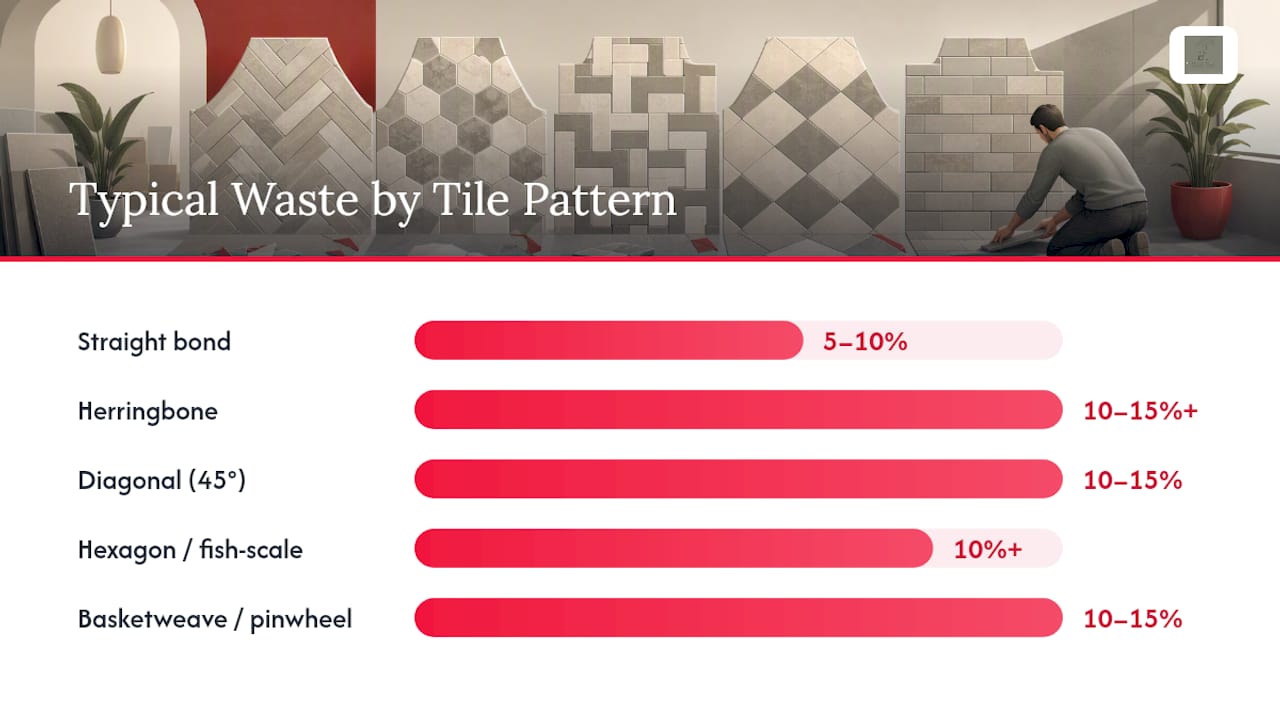
- Tile patterns like herringbone and chevron demand precise cuts and factory-mitered tiles, increasing waste to 10-15 percent and requiring professional installation on complex layouts.
- Diagonal layouts can visually widen narrow rooms but require angled cuts at perimeter tiles, also raising waste to about 10-15 percent.
- Larger grout lines or contrasting grout colors can make intricate patterns more visually prominent but increase maintenance and cleaning effort.
- A dry lay to verify pattern fit, color consistency, and transition points before adhesive application can prevent costly mistakes.
- Proper subfloor leveling and careful planning of waste allowance are crucial, especially for complex patterns, to ensure a durable and visually pleasing finish.
Table of Contents
- Tile Layout Patterns Catalog: What Each One Actually Does
- How to Choose the Right Tile Pattern for Your Room
- Planning and Preparation Before You Lay a Single Tile
- Execution Tips for a Clean, Durable Finish
- Room-by-Room Pattern Ideas That Actually Work
- Field Notes: What Trips Up Homeowners on Real Jobs
- Where Tile Patterns Actually Come From
- Common Installation Problems and How to Fix Them
- Cleaning and Upkeep by Pattern Complexity
- Choosing a Pattern That Lasts Longer Than the Trend
- Where to Go for Technical Detail
- Ready to Get It Right the First Time?
- Sources
- FAQ
Tile Layout Patterns Catalog: What Each One Actually Does
Every pattern trade off visual drama against labor, waste, and forgiveness for imperfect walls. Here's what you're actually choosing between.
Straight (stack) bond lines tiles up in a simple grid, edge to edge, with grout joints running continuously in both directions. It suits large-format porcelain and square tiles best, and it's the fastest layout to install because there's no offset math to track. Straight bond also shows every wall imperfection, since misaligned grout lines are the first thing your eye catches. Waste tends to run 5 to 10 percent for cuts and breakage.
Running bond (brick bond) offsets each row by a half tile or a third tile, the way bricklayers stagger a wall. A half offset gives you the classic subway-tile look; a third offset (common with plank-style tiles) hides lippage and uneven grout lines better because no single seam runs the full width of the room. This is the most forgiving pattern for a slightly out-of-square room.
Herringbone sets rectangular tiles at 90 degrees to each other in a zigzag, and it's arguably the most requested tile design idea in renovation right now. Run it on the diagonal (45°) toward a doorway to pull the eye down a hallway and make it feel longer. Herringbone works best on plank-format tiles with a 2:1 or 3:1 length-to-width ratio. Because every tile needs a precise cut at the border, waste runs 10 to 15 percent or more.
Chevron looks like herringbone's sharper cousin. Herringbone tiles butt together at right angles; chevron tiles are pre-cut at an angle so the ends meet in a continuous "V" with no jagged step. Chevron tile requires factory-mitered edges, which means you're buying tile specifically cut for that layout rather than standard rectangular pieces. Such layouts generate higher waste due to angled cuts leaving unusable offcuts.
Diagonal (45°) rotates a standard grid a quarter turn. This is the layout most likely to solve a genuinely awkward room, because diagonal patterns can make a narrow room look up to 30% wider. The tradeoff is that every perimeter tile needs an angled cut, which pushes waste toward 10 to 15 percent.
Basketweave and pinwheel arrange small rectangular tiles in interlocking pairs or clusters, producing a woven texture that reads as more formal or traditional. These suit bathrooms and entryways where you want visual density without a busy color palette. Cutting is fiddly around edges, so budget similarly to herringbone.
Hexagon and fish-scale tiles create organic, honeycomb-like coverage that's currently one of the most popular mosaic tile patterns for feature walls and bathroom floors. Grout lines multiply with hexagon shapes, which affects both traction (good for wet floors) and cleaning time (more lines to scrub). Waste often lands at 10 percent or higher because irregular perimeter cuts are unavoidable.
Patchwork, encaustic, and feature inlays mix multiple printed or colored tiles in a deliberately irregular arrangement. These demand careful pre-planning of the repeat sequence and are one of the few layouts where hiring a professional tiler pays for itself, since a misjudged pattern repeat is expensive to fix after the adhesive sets.
How to Choose the Right Tile Pattern for Your Room
Start with the tile you already like, not the pattern. A rectangular plank tile locks you into herringbone, chevron, or brick bond; a square tile opens up checkerboard, stack, or diagonal.
Room size and shape come next. A narrow bathroom or hallway benefits from a diagonal or herringbone layout run lengthwise, which can visually widen the space. Vertical stack patterns on a splashback or feature wall draw the eye upward and make ceilings feel taller. Horizontal running bond does the opposite, broadening a narrow room.
The 1/3 rule matters more than most DIYers realize: when you start laying tile from a wall edge, avoid ending a row with a sliver less than a third of a full tile width. A 4-inch offcut against an 18-inch tile looks like a mistake, not a design choice. Adjust your starting line, not your grout width, to fix it.
Grout color changes how loud the pattern reads. A grout that closely matches the tile color mutes the layout and lets the tile's own texture carry the room. A contrasting grout, especially on herringbone or basketweave, turns the grout lines themselves into the visual feature. Joint width follows the same logic: tighter joints (1.5 to 2mm) on rectified tile create a near-seamless look, while wider joints (3mm plus) suit rustic or handmade-look tile.
Before you visit a tile showroom or call a planner, run through this checklist:
- Confirm your tile's exact dimensions and ratio (square vs. rectangular, and by how much).
- Decide the visual goal: wider, taller, calmer, or busier.
- Choose a pattern that matches both the tile shape and that goal.
- Pick a grout color and joint width that either blends in or deliberately stands out.
- Sketch your start point and check for slivers under the 1/3 rule before ordering tile.
Pro Tip: Bring a photo of your room's longest unbroken wall to the tile store. Salespeople can tell you almost immediately whether a pattern will create awkward cuts against your specific dimensions.
Planning and Preparation Before You Lay a Single Tile
Good tile work is decided before adhesive ever touches the floor. Rooms are rarely perfectly square, so the first job is to square off the space and establish center lines rather than starting blind from one wall.
A dry lay is the cheapest insurance you'll buy on the whole project. Lay a full run of tile, unfixed, across the room or at least along the longest wall, and check for three things: pattern repeat (do printed or veined tiles clash when they sit next to their twin?), color shift between batches, and thin slivers at the edges. Adjusting a start line during a dry lay costs nothing; adjusting it after grouting costs a demolition.
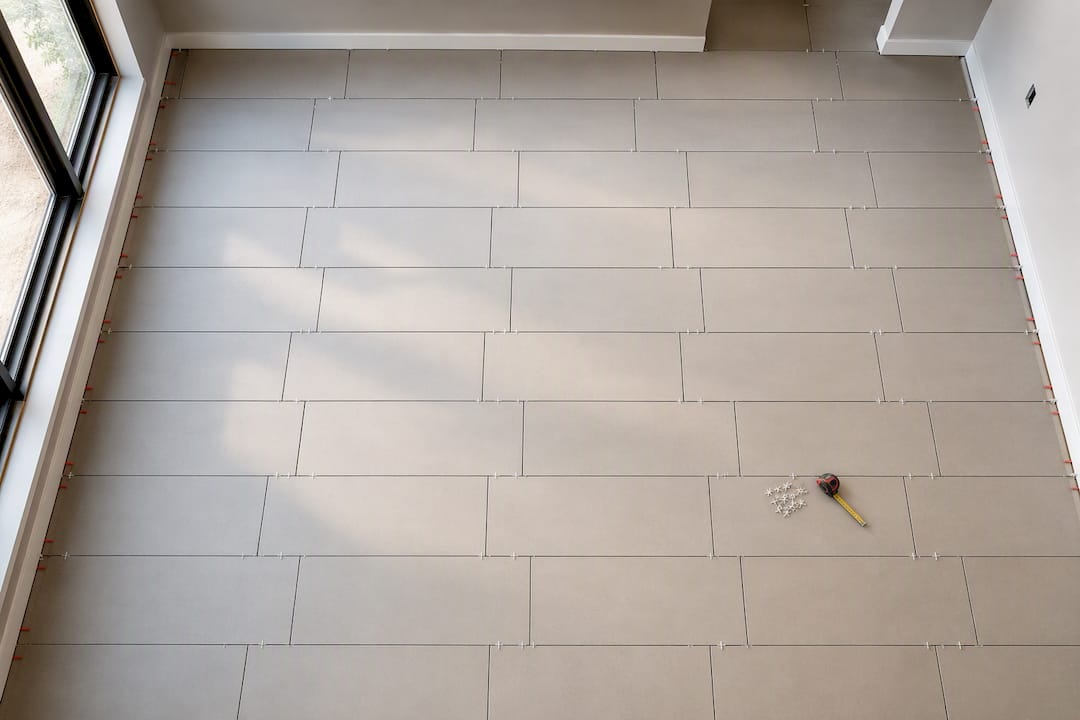
Subfloor leveling isn't optional for pattern-heavy layouts. An uneven substrate telegraphs through grout lines almost immediately, and floating or leveling compound before tiling prevents both cracking and visible lippage down the line.
Waste allowance depends entirely on pattern complexity:
- Straight grids: 5 to 10 percent extra tile for cuts and breakage.
- Herringbone, chevron, diagonal, and mosaic layouts: 10 to 15 percent extra, sometimes more on small or oddly shaped rooms.
- Patchwork or encaustic feature areas: order on the higher end of that range, since color-matched batches can be hard to source later.
Plan transition strips, thresholds, and fixed obstacles (vanities, tubs, cabinetry) into your dry lay too, since a pattern that looks perfect on paper can hit a doorway at an awkward angle.
Execution Tips for a Clean, Durable Finish
Grout width and color decisions made during planning need to survive contact with a trowel. Keep joint width consistent across the whole floor. A joint that drifts from 2mm to 4mm across a room is one of the most common signs of an amateur tile job, visible from across the space.
Orientation matters at thresholds. If tile runs one direction in the kitchen and turns 90 degrees at the doorway into a hallway, the mismatch reads as unplanned rather than deliberate, so plan the transition point during your dry lay, not during installation.
Cutting technique changes with pattern complexity:
- Use a wet saw for herringbone and chevron cuts. The precision matters more than on a straight grid, since a slightly off angle compounds visibly across a dozen tiles.
- Tile nippers work fine for small adjustments on mosaics and hexagon sheets, where cuts are minor and irregular anyway.
- Always cut away from your body and wear eye protection with a wet saw. Porcelain dust and chips are sharp.
- Double check every perimeter cut against the 1/3 rule before committing it to adhesive.
For wet areas like bathroom floors and showers, prioritize slip resistance over pure aesthetics. Smaller-format tiles like mosaics and hexagons add grout lines that function as traction, while large-format tile needs a textured or matte finish to compensate.
Pro Tip: Dry fit and photograph an entire feature wall or floor section before grouting. A phone photo often reveals pattern-repeat clashes your eye misses standing three feet away with a trowel in hand.
Room-by-Room Pattern Ideas That Actually Work
Bathrooms reward small-format patterns. Mosaics, hexagons, and basketweave give you traction underfoot and enough visual detail to carry a small room without needing bold color.
Kitchen splashbacks are where vertical stack bond, herringbone, or an offset subway layout earn their keep, drawing attention upward and framing a range hood or window without competing with cabinetry.
Hallways and entries benefit most from diagonal or herringbone tile run along the length of the space, since both layouts create the strongest sense of added width or length in a room, as noted earlier.
Feature floors are where you can be bold: checkerboard in contrasting tones, or an encaustic-style patchwork, work as a genuine focal point in an entry or a butler's pantry precisely because they're contained to one area.
Outdoor spaces call for a different rulebook entirely. Large-format, slip-rated pavers laid in a simple running bond hold up to weather and foot traffic better than anything intricate, and a straightforward outdoor layout also plays nicely with paver installation work if you're extending tile from an indoor living area onto a patio.
Field Notes: What Trips Up Homeowners on Real Jobs
Pre-install checks come down to three things every time: verifying the subfloor is level, running a full dry lay, and confirming waste allowance before ordering. The three mistakes that show up most often on renovation sites are skipping the dry lay entirely, tiling over an unlevel subfloor, and choosing a grout color without testing it against a sample board first. A straight running bond in a small bathroom is a reasonable DIY project. Herringbone, chevron, or any layout involving factory-mitered tile is where hiring a tiler protects your budget more than your pride.
Where Tile Patterns Actually Come From
Herringbone gets its name from the skeleton of a herring fish, and the pattern shows up in Roman road construction, where engineers used angled brick paving (called opus spicatum) because the interlocking angles resisted cart traffic better than a straight grid. Chevron traces to French parquet flooring from the 17th and 18th centuries, where cabinetmakers pre-mitered wood planks for grand hallways in palaces like Versailles, long before the technique moved to ceramic tile.
Basketweave patterns borrow directly from actual woven basket construction and appeared in Roman and Byzantine mosaic floors, where small rectangular stone pieces were arranged to mimic textile weaving. Hexagonal tile has roots in both ancient Roman bathhouses, where small hex mosaics provided grip on wet stone floors, and in Victorian-era encaustic tile work, which used the same six-sided shape to create elaborate multicolor floor designs in churches and civic buildings.
Checkerboard tile, maybe the most recognizable pattern of all, has a lineage running through European Renaissance church floors and later became a signature of American diner and kitchen design in the mid-20th century. Each of these patterns survived for centuries for the same practical reason: interlocking geometry distributes weight and wear better than a plain grid, which is exactly why they're still the default recommendations today.
Common Installation Problems and How to Fix Them
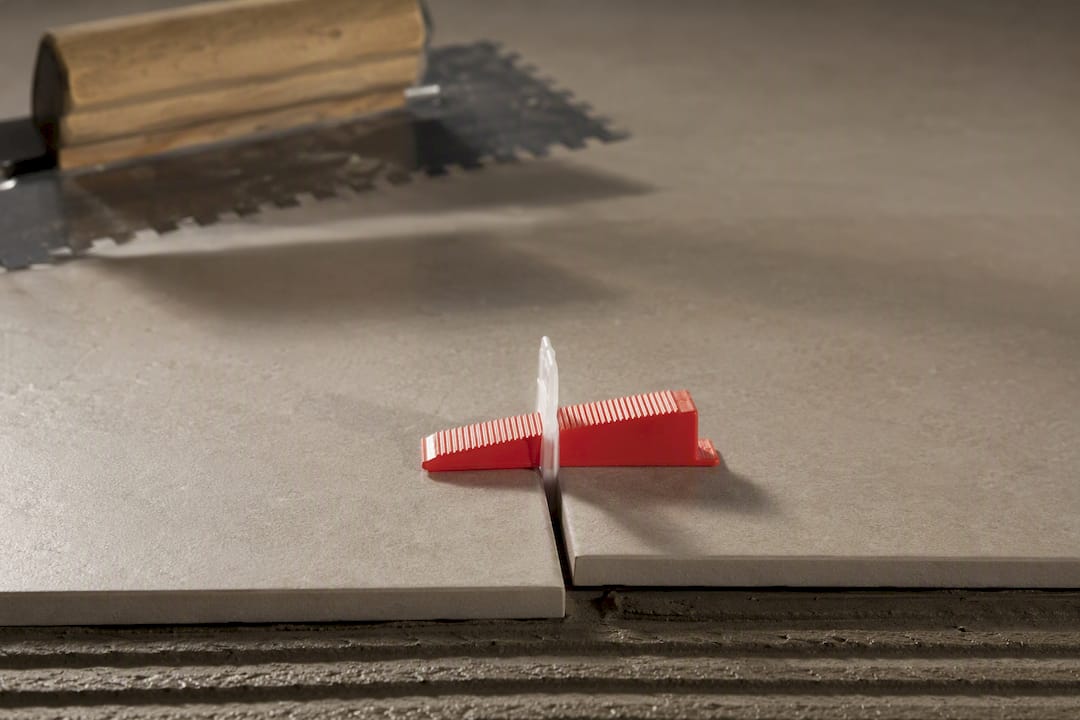
Lippage, where adjacent tile edges sit at slightly different heights, is the most frequent complaint on complex layouts. It usually traces back to an unlevel subfloor or inconsistent adhesive bed thickness, which is why leveling clips and spacers matter more on herringbone and chevron than on a basic grid, where minor height differences are less visible.
Pattern drift is the second big issue: small alignment errors that seem invisible on tile three or four compound into a visibly crooked line by tile twenty. Snap chalk lines every few rows on herringbone and chevron jobs, not just once at the start, to catch drift before it becomes a re-do.
Color and shade variation between tile boxes, sometimes called batch variation, ruins an otherwise perfect layout if it's not caught early. Mixing tiles from multiple boxes as you work, rather than laying one box at a time, spreads any shade variation evenly across the floor instead of leaving an obvious patch.
Grout haze on textured or matte tile, especially hexagon and mosaic sheets with more surface texture, is harder to clean off after the fact than on smooth porcelain. Sealing porous or textured tile before grouting makes cleanup dramatically easier, and it's a step worth doing even on a rushed weekend project.
Cleaning and Upkeep by Pattern Complexity
Grout line density drives almost all of the maintenance difference between patterns. A straight or running-bond layout on large-format tile has the fewest grout lines per square foot, which means less scrubbing and less grime accumulation over time. Hexagon, mosaic, and basketweave layouts multiply grout lines significantly, which improves slip resistance in wet areas but also multiplies the surface area where dirt and mildew can collect.
Sealing grout on any intricate pattern isn't optional maintenance, it's preventive. Unsealed grout on a hexagon bathroom floor will discolor faster than the same grout on a simple kitchen grid, purely because there's more of it exposed per square foot of floor. Resealing every 12 to 18 months in wet areas keeps that from becoming a visible problem.
Patchwork and encaustic-style tile, especially cement-based versions, need pH-neutral cleaners exclusively. Standard bathroom cleaners with acidic ingredients will etch and dull the surface pattern over time, which defeats the entire point of choosing a decorative feature floor.
Choosing a Pattern That Lasts Longer Than the Trend
Architectural fit beats trend-chasing almost every time. A herringbone floor that suits your home's proportions will still look intentional in fifteen years; a heavily contrasted grout choice picked purely because it's fashionable right now often won't. Save bold, trend-driven patterns for a contained accent, a splashback or a powder room floor, where a future update is cheap. Save your main living areas for layouts your home's architecture can actually support long term, and weigh grout contrast and intricate mosaics against how they'll show wear and affect resale before you commit.
— Sarah
Where to Go for Technical Detail
For pattern-specific installation notes and waste guidance, the Tile Laying Patterns Guide and Johnson Tiles' pattern breakdown cover manufacturer-level detail worth reviewing before you order material.
Ready to Get It Right the First Time?
Choosing the pattern is the easy part. Getting the subfloor level, the waste allowance correct, and the cuts precise on herringbone or chevron is where most DIY tile jobs go sideways. If your project involves anything beyond a simple straight or running-bond layout, or you'd rather not spend a weekend re-laying a botched dry run, Ariya Construction manages tiling and full renovation projects from planning through handover, with a single point of contact coordinating the trades so the pattern you picked actually ends up on your floor the way you pictured it.
Sources
- A guide to tile patterns that transform a room
- The Art of Tile Layout Patterns - Johnson Tiles
- Tile Laying Patterns Guide
FAQ
What is the best tile layout pattern?
There's no single best pattern. Straight or running bond suits budget-conscious, low-maintenance rooms, while herringbone and diagonal layouts suit rooms where you want to visually widen or lengthen the space.
What is the 1/3 rule in tile layout?
The 1/3 rule says you should avoid ending a row with a cut tile narrower than a third of a full tile's width, since anything smaller reads as an installation mistake rather than a deliberate design choice.
What are the general rules for tile layout?
Square the room and set center lines before you start, always dry lay the pattern first to check for slivers and color shift, level the subfloor to avoid cracking, and order 10 to 15 percent extra tile for complex patterns versus 5 to 10 percent for a straight grid.
Is there a tile layout app or visualizer?
Several tile manufacturers and retailers offer online visualizer tools that let you preview a pattern on a virtual floor plan before ordering, which is worth using alongside a physical dry lay rather than instead of one.